Skip to Main Content

Welcome to

Together is a new resource for anyone affected by pediatric cancer - patients and their parents, family members, and friends.

Learn More
Blog

How to Clean the Tracheostomy (Trach) Stoma

What is a trach stoma?

A tracheostomy (trach) is a small opening through the skin into the windpipe (trachea). This opening is called a stoma or trach site. A small plastic tube called a tracheostomy (trach) tube is placed through the stoma to help your child breathe.

When to clean the trach stoma

Clean the tracheostomy stoma daily to help prevent infection and irritated skin.

Trach ties keep the trach tube in place. They must be changed every day at the same time you clean the trach stoma. Change the trach ties when they are wet or soiled.

Watch this video to learn how to clean and sanitize a tracheostomy (trach) stoma.
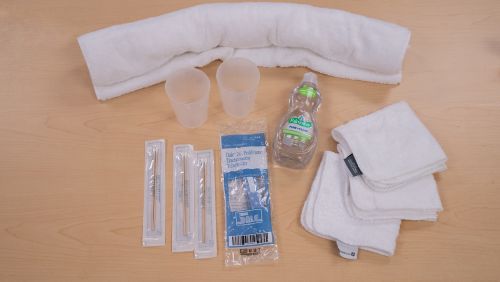
Supplies needed to clean the trach stoma

Cleaning trach supplies

Gather all needed supplies before changing the trach stoma.

Always use 2 caregivers to clean the trach stoma. One caregiver will clean the stoma and change the ties. A second caregiver will hold the trach in place and help as needed.

  • Suction kit
  • Suction machine
  • Towel roll
  • 6 cotton swabs (you might need more if the site is heavily soiled)
  • Liquid antibacterial soap or baby shampoo
  • 3 washcloths
  • 2 cups
  • Water
  • Pre-cut trach ties
  • Emergency supplies (always keep emergency supplies with your child and within reach)

Prepare to clean the trach stoma

  • Clean your work area with disinfecting wipes.
  • Gather supplies.
  • Both caregivers should wash hands with soap and water or use an alcohol-based hand sanitizer.
  • Pour clean water in a cup.
  • Put a few drops of the soap in the bottom of the second cup and add clean water.
  • Place 3 cotton swabs in each cup.
  • Wet one washcloth with clean water and set aside.
  • Wet a second washcloth. Then add some liquid soap. Work the washcloth together in your hands to create suds. Set aside.
  • Position your child safely lying down where both caregivers can view and reach the trach and neck area. Place a towel roll under the child's shoulders to make it easier to see the trach stoma.
  • Before you start cleaning, your child may need suctioning to help prevent coughing. Learn more about how to suction a tracheostomy.

Clean the neck using washcloths

  • The secondary caregiver uses a pointer finger and middle finger on the flanges to hold the trach in place.
  • The primary caregiver undoes the trach tie on one side. Push the trach tie under the neck until it comes out the other side.
  • The primary caregiver uses the soapy washcloth to clean the neck area. Start close to the stoma and wipe away from it.  
  • The primary caregiver repeats the previous step with the clean wet cloth. During this step, check the skin. Check the skin for redness or irritation. Report skin problems to your child’s doctor when you finish cleaning the stoma.
  • The primary caregiver uses the dry washcloth to gently pat the skin dry. Do not rub the skin with a dry washcloth.  
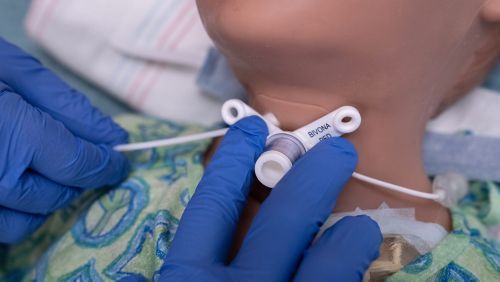
Nurse demonstrates the tightness of trach stoma around a mannequin's neck

One finger should fit between the trach ties and the neck.
Change the trach ties

  • The primary caregiver picks up 1 of the new trach ties. Hold the end that has a sticky (Velcro) side away from the skin. Put that end through the flange hole on the clean side of the neck. Then, secure this end to the fabric.
  • The primary caregiver removes the old trach ties from the other side of the trach.
  • The primary caregiver repeats the previous cleaning steps using soapy, wet, and dry washcloths to clean the other side of the neck. Always wipe away from the stoma.  
  • Once the neck is dry, the primary caregiver attaches the second new trach tie to the second flange.
  • While keeping control of the trach and the child’s head, the secondary caregiver lifts the head and neck. The primary caregiver secures the 2 trach ties together in the back.  
  • The secondary caregiver should not let go of the trach until they make sure the trach ties are not too tight or too loose. One finger should fit between the trach tie and the neck. If the ties are too tight, they can cause pressure injuries.
  • After cleaning the trach stoma and changing ties, you can put a new dressing around the trach if needed.  
Nurse demonstrates where the trach stoma flanges are.

Clean each flange with a cotton swab, wiping away from the stoma.

Clean around the stoma using cotton swabs

  • The primary caregiver takes 1 soapy cotton swab and places it under a flange close to the trach hub. Wipe outward away from the stoma. Discard the swab.
  • Repeat the previous step with the second soapy cotton swab under the other flange.  
  • Use the third soapy cotton swab to clean the top of the flanges. Be sure to wipe away from the stoma. Then discard the swab.  
  • Repeat the first 3 steps using clean, wet cotton swabs. This will help remove the remaining soap. 

When to call your care team

If you have questions about cleaning the trach stoma, speak to your child’s care team.

Call your care team if your child has:

  • Redness, pain, or hardness around the trach stoma
  • Mucous from the trach stoma that smells bad
  • Bright red blood coming out of the trach stoma that does not stop flowing

Key points about cleaning the trach stoma

  • Clean your child’s trach stoma daily to prevent infection and irritated skin.
  • Always use 2 caregivers to clean the trach stoma.
  • Follow the steps to clean the trach stoma as instructed.
  • Call your child’s care team if you have questions about cleaning the trach stoma.


Reviewed: December 2023